This is a guide with tutorials on how to get started with Januas.
If you purchased a support license you can log into our support portal to clear any doubt about the theme.
We do not offer general WordPress Support, please do read our support terms before raising a support ticket.
If you have any question about your purchase you can write a message to the email address on your purchase receipt.
1. Getting Started with WordPress
2. Getting Started with Januas
4. First Januas Settings
4.1 Theme Color
4.2 Home Layout
4.3 Search Layout
4.4 Home Quick Search
4.5 Footer Left Text
4.6 Footer Right Text
4.7 Dummy Content
7. Editing Home Widgets
7.1 Home Top Left Sidebar
7.2 Home Top Right Sidebar
7.3 Home Bottom Sidebar
7.4 Footer Top Sidebar
7.5 Footer Middle Sidebar
7.6 Footer Bottom Left Sidebar
7.7 Footer Bottom Center Sidebar
7.8 Footer Bottom Right Sidebar
10. Creating Your First Event
10.1 Title and Description
10.2 Event Categories
10.3 Featured Image
10.4 Navigation
10.5 Event Information
10.6 Speakers
10.7 Register
10.8 Schedule
10.9 Videos
10.10 Sponsor
10.11 Map
10.12 Files
10.13 Pictures
10.14 Social Box
10.15 More
11. Sessions and Speakers
11.1 Creating a Schedule Page
11.2 Creating an Event
11.3 Creating a Session
11.4 Creating a Speaker
11.5 Assigning Speakers to Sessions and Sessions to Events
13. Language Integration
14. Event Espresso Integration
15. Woocommerce Integration
16. Tickera Integration
17. Eventbrite Integration
18. Gravity Forms Integration
1. Getting Started with WordPress
Januas is a WordPress Theme (Tip: What is WordPress?) designed to manage multiple events.
If you are an event professional that runs more than one event per year, congratulations “ you made the right choice.
Using Januas requires an intermediate knowledge of WordPress. Meaning that you should be confident with the basics of WordPress.
Our theme is made for WordPress.org (as opposed to WordPress.com) this means you need a hosting provider where to activate the theme. If you don’t have a hosting provider, we suggest WPEngine.
If you are not confident with WordPress, we suggest 3 actions:
1. Watch the following Videos: What is WordPress? “ How to Install WordPress “ The Dashboard & Read the handy guides at WPBeginner. Everything you need to know about running a WordPress site is in the web.
As WordPress is a community effort, there is an answer for most of the doubts you may have.
2. Run a test installation with the default theme and give it a whirl. Play with it and get confident with different sections of the Dashboard.
3. Use the WordPress Forums and Docs. Search the Forums for your question, there will probably be an answer.
2. Getting Started with Januas
We built Januas using the best that WordPress has to offer to serve the purpose of running an event portal.
There are two main areas of Januas you should be confident with:
1 “ The Home Page
2 “ The Single Event Page
These are the true new introductions of Januas to the WordPress environment.
The Home Page displays a Featured Event and a selection of your upcoming/past events. You decide what gs where.
The Single Event Page collects all the information about a specific event. You decide what gs where and what to display for your Event.
But first things first. Let’s activate Januas.
3. Installing Januas
To activate Januas head to Appearance->Themes
Click Upload Theme.

Browse for the Januas .zip file and upload it
Click on Activate.

How to Update Januas
- Create a full website backup: This step is crucial; it will allow you to recover the site in case the update couldn’t be completed.
- Save any custom CSS you have stored under Appearance > Customize > Additional CSS.
Note: If your custom CSS is inside a child theme, it shouldn’t be a problem.

- Choose a different WordPress standard theme in the meantime. You can choose one of the WordPress standard themes.

- Delete your parent theme (in this particular case, Januas).

- Download the last version of your theme from your account member area.
- Install your parent theme again; the version number should change; you are free to check our changelog.
- Install the classic editor (if you don’t have that plugin already installed).
- Change the settings of your “Classic editor” >> Default editor for all users: Classic Editor.
- Activate your parent or child theme (that will depend on your initial setup).
4. First Januas Settings
Now that you have activated Januas, it is time to set it up according to your needs.
Please head to Appearance->Januas Options (If you can’t see this item under Appearance, try re-installing the theme).
We always suggest to activate the theme on a fresh WordPress Installation with no plugins and no previously populated content).
Let’s have a look at the available options:
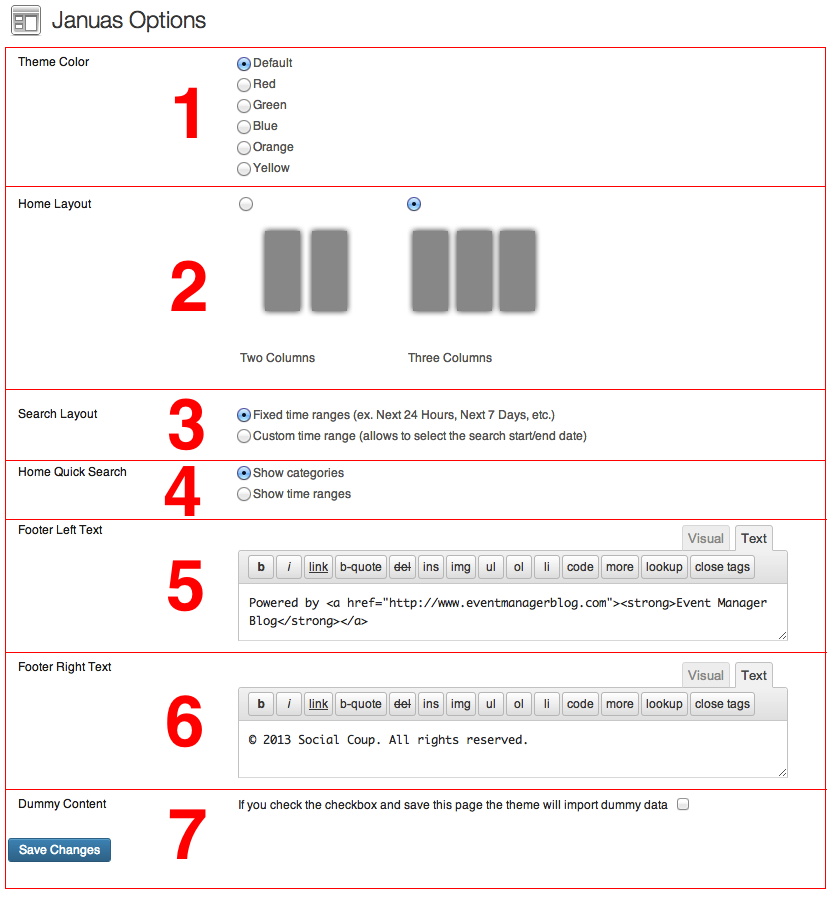
Click on Image to enlarge
4.1 Theme Color
Here you can decide the color of Januas. Your new theme comes in 5 different colors. Choose the one that works best with your identity.
Note: We do not offer support on further color customization. You may seek CSS and design skills to choose further customization.
4.2 Home Layout
You can decide whether to list your events horizontally or vertically. The horizontal layout will result in a two column layout, the vertical in a three color one.
We suggest to use the two column format when you have less than 6 events happening/happened. In fact the two column layout is perfect to display 4 or 5 events.
The 3 column layout is perfect for better visual impact and with 6+ events.
Once you have populated the site with your events, try switching between the two and decide what works for you.
You decide which event gs in the home page from the Event Information area.
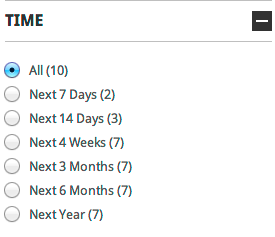
4.3 Search Layout
Here you can decide how website visitors will be able to filter your events on the search results page.
You can let them filter events by Fixed Time Ranges as in the picture below:
or you can allow your visitors to enter their preferred time range, as in the screen below:
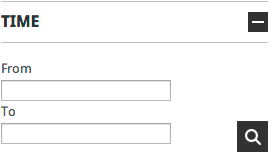
This pretty much depends on the spacing between your events, as fixed ranges reach maximum a Year time range.
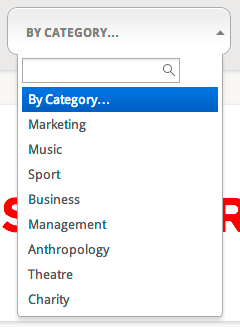
4.4 Home Quick Search
You can decide whether your visitors can browse your events by Event Category:
or by Time Range
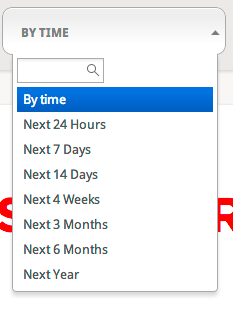
Once again the consideration to make here is whether your events are in intervals greater than a Year as your visitors won’t be able to visualize time ranges greater than ˜Next Year’.
4.5 Footer Left Text
Decide what gs in the left side of the footer. In the demo, it is this section:
4.6 Footer Right Text
As per the above “ this is the Right Section
4.7 Dummy Content
Please read this carefully.
By ticking this box you will populate the whole site with dummy content. While this is great if you don’t know where to start, it is non revertible.
Therefore you will need to delete the unnecessary content generated. This can take quite some time.
We suggest to populate with dummy content only if you are not sure about how WordPress works and want just to edit content and pictures.
Note: Populating the site with dummy content ds not exclude reading this guide as you may still need to refer to it to change the populated options.
5. Changing the Site Logo
Please Head to Appearance-> Header
From here you can upload the logo of your organization. Note that this is the logo Januas on the demo Home Page.
The logo will appear through the site and on each event. Please do upload an image of exactly the size of 306 � 87 pixels. Altering the logo size will predict the functionality of the top bar.
6. Editing Blog Sidebar
Please Head to Appearance-> Widgets
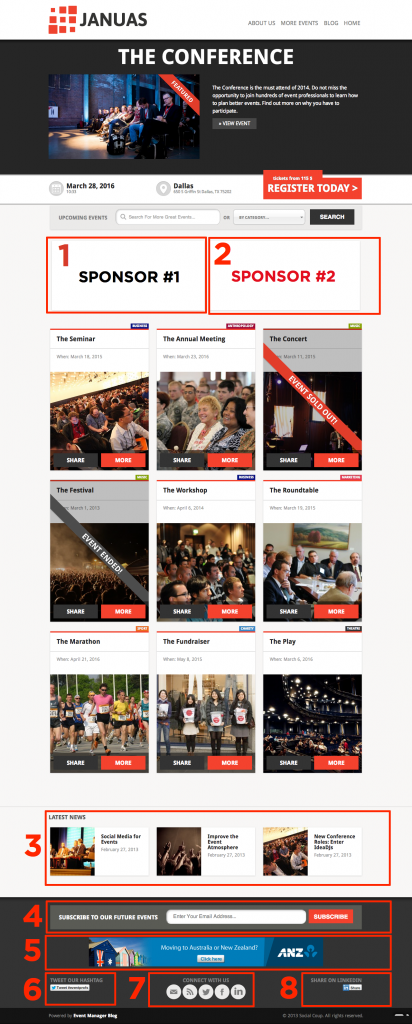
The Primary Sidebar defines the widgets that go in the Blog Sidebar “ see the demo here. In this example we added the Search Widget “ Recent Comments and a Text widget with a Sponsor Image.
7. Editing Home Widgets
Please Head to Appearance-> Widgets
Here are the different Widgets in the Home Page
7.1 Home Top Left Sidebar
This space has been allocated for a global Sponsor logo. In the demo, we added a Text widget and uploaded an image of exactly 473px by 216px.
The HTML code (replace the text with actual urls) to achieve this is:
7.2 Home Top Right Sidebar
As per the above, this space has been devoted to another sponsor banner. Follow the above directions to show a sponsor in this area.
7.3 Home Bottom Sidebar
This space has been designed for the Januas Latest News Widget. Here you can display the latest news from the blog or News Centre. Note that the Januas Latest News Widget has been designed specifically for this section. It won’t work in other sections nor we will be able to provide customized versions of it.
7.4 Footer Top Sidebar
This space has been allocated for the Januas Feedburner Email Widget. Simply drag and drop it in this section. Note that the Januas Feedburner Email Widget has been designed specifically for this section. It won’t work in other sections nor we will be able to provide customized versions of it.
7.5 Footer Middle Sidebar
This section has been created for another Sponsor Placement. Please follow the directions in section 1 or 2. In this case the optimal width is 728px by 90px
7.6 Footer Bottom Left Sidebar
You can add your item of preference here. We added the Januas Twitter Widget in our example.
7.7 Footer Bottom Center Sidebar
You can add your item of preference here. We added the Januas Connect Widget in our example.
7.8 Footer Bottom Right Sidebar
You can add your item of preference here. We added the Januas LinkedIn Widget in our example.
8. Adding Top Menu
The Top Menu you see here:
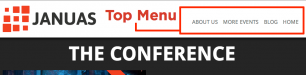
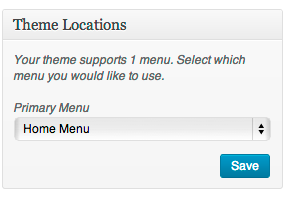
Can be easily customizable by heading to Appearance-> Menus
Create a Menu and save it (Tip: Read more about creating Menus)
Save and remember to select the newly created Menu from the dropdown under ˜Theme Location’.
Remember not to add too many items here as it will impact on the layout rendering. This is an ideal space to describe your organization or to place a link to the Blog.
9. Create a Blog
Head to Settings->Permalinks
Select Post Name and save.
Head to Posts-> Categories
Change the name of the default ˜Uncategorized’ category by clicking on ˜Edit’. Rename it to Blog or News or whatever taxonomy you prefer to call your Blog page.
Then head to Posts->Add New and add your first article.
To display the blog in your Top Menu, just copy head to http://example.com/category/blog (if you named it ˜blog’ that is) and then add it as a Custom Link in your menu as per the section above.
10. Creating Your First Event
This is the single largest introduction of Januas. You can decide pretty much whatever gs in your event page. Please do read carefully all the different options as it will help you to make the most out of Januas.
Familiarize with the different sections of the theme:

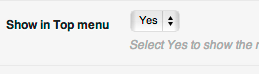
Section 1 “ Top Menu
You can decide the items to display here by checking/uncheking the Show in Top Menu option on each Box. These are quick links that help visitors to quickly skim through the sections of the event page.
Section 2 “ Event Information
This is where all the information of your event gs, together with the Featured Image and the social buttons.
Section 3 “ Main
This is the Main section of the event page. You can decide what gs here. The Event Description and Register boxes cannot be moved from the Main section.
You can toggle the position of a box in Main by selecting it in Position .

Section 4 “ Sidebar
This is the Sidebar section of each event. You can decide what gs here. The Event Description and Register boxes cannot be moved to this section.
You can toggle the position of a box in Sidebar by selecting it in Position as per the above example. Please note that in the mobile version, only the items in the main section will be shown.
10.1 Title and Description
These are the only mandatory fields of the whole page.
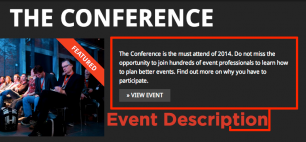
Describe what your event is about. If you decide to make an event Featured (more on this in the next section), the first 55 characters of the description will be displayed in the Home Page as in the image below. Remember not to add any picture here as it may compromise the layout.
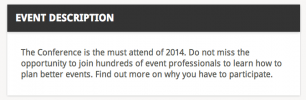
If you don’t feature the event, the description will be shown in a box looking like the one below:
You will be able to decide wether to show the ˜Description’ label on top of the box or the Top Menu from the next section Event Information.
Please note that the Event Description position can’t be moved to the sidebar..
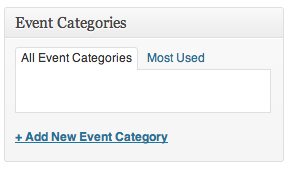
10.2 Event Categories
Here is where you define the category of your event. You define the categories of the event.
To set a category, simply click on ˜Add New Event Category’ and type the name of your chosen category from the input below:
A good strategy with Event Categories is to populate them beforehand instead of adding them one by one. This will allow you to simply select them form the same input when populating the event.
To create categories in advance, head to Events-> Categories
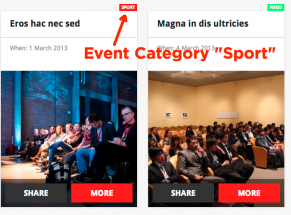
Enter the Name and Slug. Then Save. Once saved open the newly created category to assign a color. This is particularly important as each event has a category label and color in Home Page and Search.
To assign a color, click on Select a Color to either pick or enter the HEX value of a color:
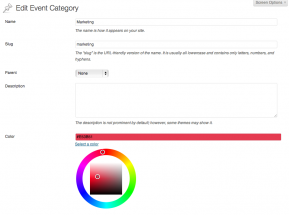
To make the colors of your categories consistent, we suggest to use a colour palette. Head to Colour Lovers for some inspiration.
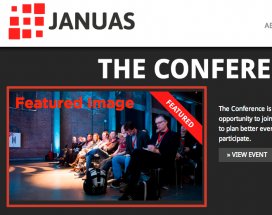
10.3 Featured Image
This is where you set the picture that will show up here:
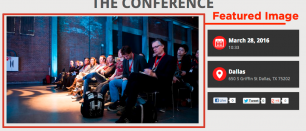
and also here if the event is Featured:
To set a Featured Image look next to the Description box on the right hand side for:
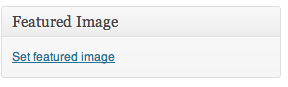
Click on Set Featured Image “ upload an image and save.
10.4 Navigation
Januas comes with a lot of options. We decided to add the Navigation panel to help you move quickly through different event page boxes. Each box has also a Back to Top link that will take you back to Navigation.
![]()
10.5 Event Information
This is the control panel of your event. From here you can decide vital information and where the event appears on the site.
Let’s have a look at the panel:
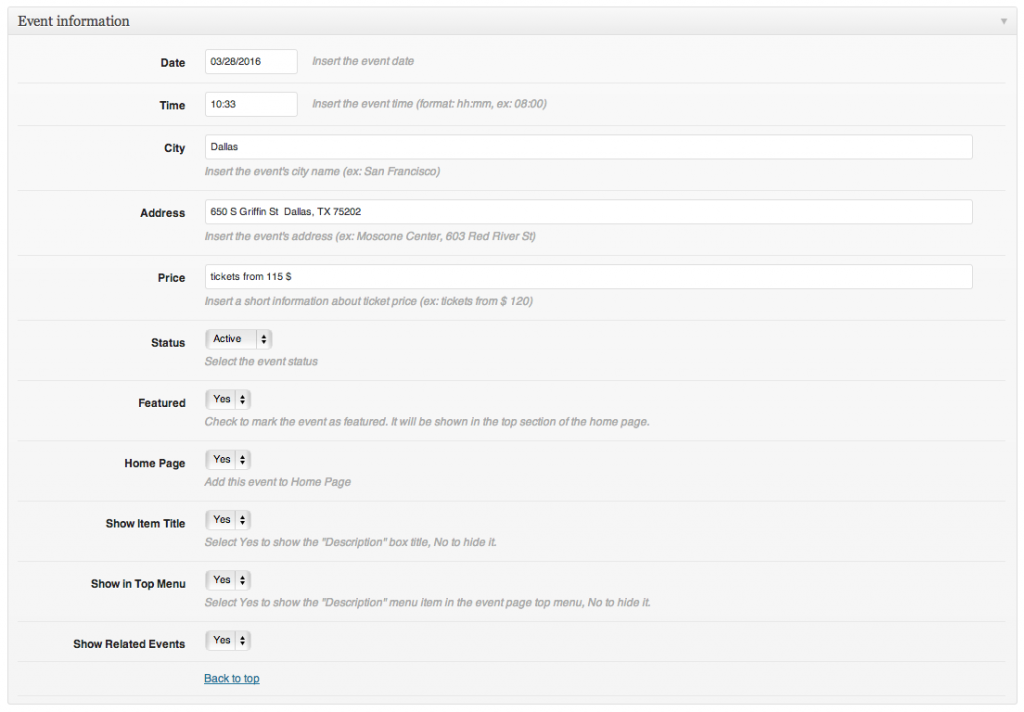
You have the following options:
– Date: the Date of the Event. The date format will be inherited from the Global WordPress Settings (Settings->General)
Please note: The date must be entered in the following format mm/dd/yyyy
– Time: the time of your event “ please enter the time in 24:00hrs ie 5pm is 17:00, 9am is 09:00
– City: the name of the City of your event
– Address: the Address or Venue information
– Price: a string of text to indicate your event ticket price. Enter your preferred text
– Status: you can decide whether your event is Active (accepting registration), Sold Out (if you are not accepting registrations) or Ended (If the event has ended). If you choose Sold Out or Ended a watermark will be applied to the event listing in the Home page and Search.
– Featured: selecting Yes highlights the event as the main Featured event on the Home Page.
– Home Page: you can decide whether the event is listed on the home page (note events will be listed in chronological order)
– Show Title: To display/hide the title of the box Description
– Show in Top Menu: to display/hide the quick link Description on the Top Menu
10.6 Speakers
This box controls the display of event speakers.
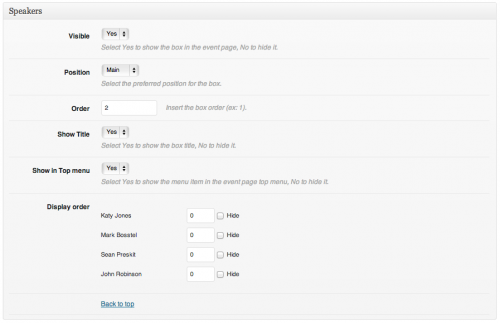
If this is your first event, it is highly likely that you can’t see anything under Speakers. In fact this box only controls the display of Speakers. For the creation and allocation of speakers, please check the Sessions and Speakers section.
You can decide whether to display speakers in Visible section.
You can decide whether to display speakers in the Main or Sidebar section from the Position dropdown.
The dropdown Order allows you to choose where to display the box in your chosen Position.
We call them speakers but they can also be performers. If this is the case you can decide to select No from the dropdown Show Title.
You can choose to display a quick link to the Speaker section by choosing Yes from the Show in Top Menu dropdown.
Lastly the Display Order lets you decide the order of display of the speakers and whether to show certain speakers or not (tick the Hide box to hide them).
10.7 Register
If you want to integrate any ticket system inside your event, you need to add this information. Note: You can certainly try to drop a widget or a script from other registration services but we won’t guarantee it will display properly on the site.

You have the following options:
- Visible: to display/hide the box on the page
- Order: to decide where the box gs in the Main section (Sidebar positioning is not possible with Register)
- Show Title: To display/hide the title of the box Register
- Show in Top Menu: to display/hide the quick link Register on the Top Menu
- Registration Script: this is where you insert the code from Woocommerce, Eventbrite, Event Expresso, Gravity Forms, or Tickera.
Note: on this screenshot, it’s using the Woocommerce shortcode.
10.8 Schedule
This box controls the display of the schedule on the event page. Please refer to the Sessions and Speakers section to create a Schedule.
The link View the Full Schedule appears only when a Schedule page has been created, once again refer to the Sessions and Speakers section.
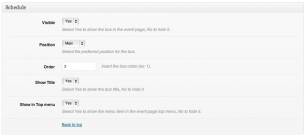
You have the following options:
– Visible: to display/hide the box on the page
– Order: to decide whether to display the box on the Main or Sidebar section.
– Show Title: To display/hide the title of the box Schedule
– Show in Top Menu: to display/hide the quick link Schedule on the Top Menu
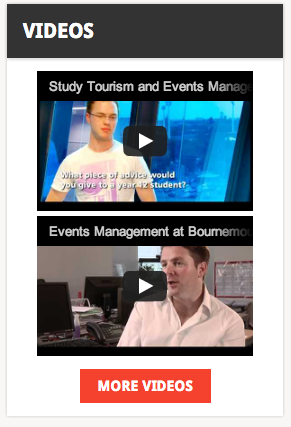
10.9 Videos
This box controls the display of up to 2 featured videos on the event page and a link to a Video Channel Page.
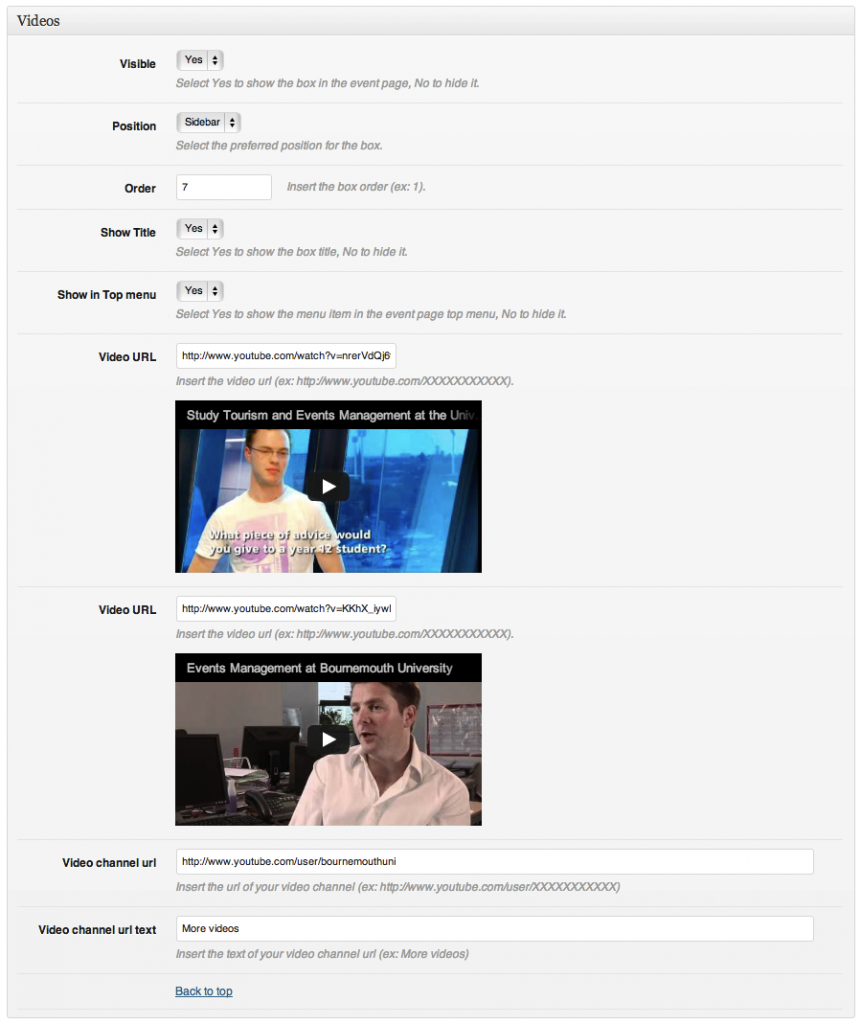
You have the following options:
– Visible: to display/hide the box on the page
– Order: to decide whether to display the box on the Main or Sidebar section.
– Show Title: To display/hide the title of the box Videos
– Show in Top Menu: to display/hide the quick link Videos on the Top Menu
– Video URL: Add a URL from Youtube or Vimeo to display a video of a speaker or previous edition of the event.
Leaving one of the two URL inputs blank will result in only one video showing.
– Video Channel URL: You can add a link of your preference here to a Youtube or Vimeo Channel or to a page with Videos.
– Video Channel URL text: This will be displayed on the button linking to your Video Page. In this example the button says More Videos
10.10 Sponsor
This box allows you to display an image for a sponsor.
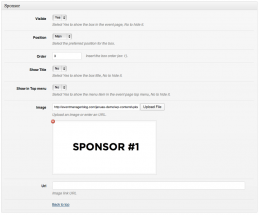
You have the following options:
– Visible: to display/hide the box on the page
– Order: to decide whether to display the box on the Main or Sidebar section.
– Show Title: To display/hide the title of the box Sponsor
– Show in Top Menu: to display/hide the quick link Sponsor on the Top Menu
– Image: Here you can upload the logo or banner of your sponsor. You can create an image with multiple logos if you have more than one sponsor.
– Url: Here you can add a link to your sponsor website
10.11 Map
This box lets you display a Google Map for your event.
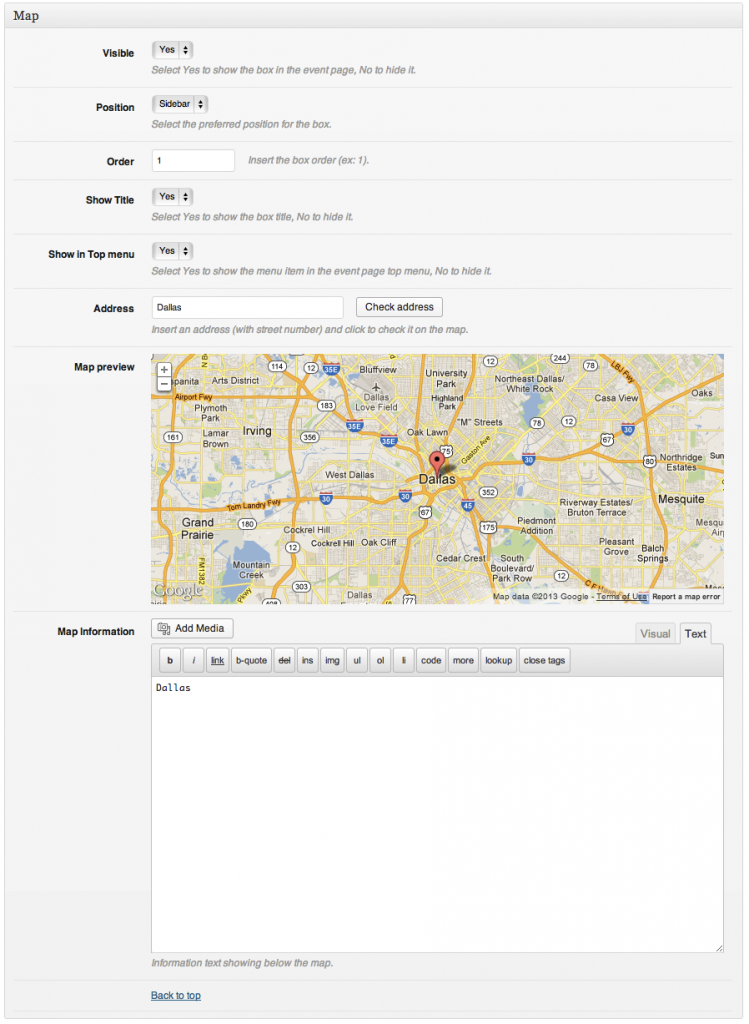
You have the following options:
– Visible: to display/hide the box on the page
– Order: to decide whether to display the box on the Main or Sidebar section.
– Show Title: To display/hide the title of the box Map
– Show in Top Menu: to display/hide the quick link Map on the Top Menu
– Address: Enter the complete address of your venue here to update the map.
– Map Information: Enter the address and any relevant information about your venue.
Remember to dose text and media as they may have a negative impact on the layout.
10.12 Files
This section is ideal if you want your visitors to download files such as Maps, Schedules and Brochures.
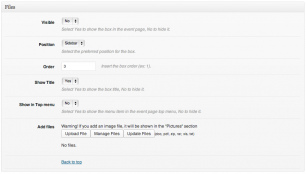
You have the following options:
– Visible: to display/hide the box on the page
– Order: to decide whether to display the box on the Main or Sidebar section.
– Show Title: To display/hide the title of the box Downloads
– Show in Top Menu: to display/hide the quick link Downloads on the Top Menu
– Add Files: Here you can add files with the extension doc, pdf, zip, rar, xls, txt. Do not upload any image (jpg, png, gif etc) as they will displayed in the Pictures box.
10.13 Pictures
This is the box where you can show a Picture gallery of your event.

You have the following options:
– Visible: to display/hide the box on the page
– Order: to decide whether to display the box on the Main or Sidebar section.
– Show Title: to display/hide the title of the box Pictures
– Show in Top Menu: to display/hide the quick link Pictures on the Top Menu
– Upload: to upload your pictures. Remember to upload the pictures in your preferred display order.
– Manage Gallery: to manage your pictures
– Update Gallery: to display the pictures you just uploaded in the back end.
10.14 Social Box
This box displays a Facebook Page widget on your event page
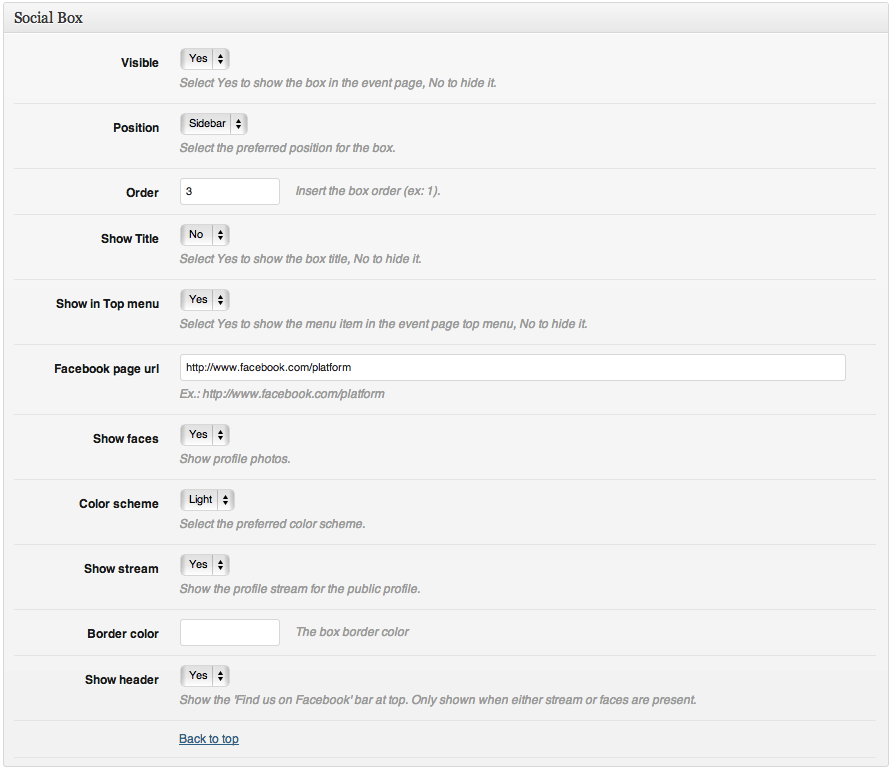
You have the following options:
– Visible: to display/hide the box on the page
– Order: to decide whether to display the box on the Main or Sidebar section.
– Show Title: to display/hide the title of the box Facebook
– Show in Top Menu: to display/hide the quick link Facebook on the Top Menu
– Upload: to upload your pictures. Remember to upload the pictures in your preferred display order.
– Facebook Page Url: the address format is http://facebook.com/nameofthepage “ (facebook.com/pages/name won’t work)
– Show Faces: to display the faces of those who liked your page
– Color Scheme: pre-set Facebook Light or Dark
– Show Stream: hide/display the stream of updates on your page
– Border color: type the name of a color if you want a coloured border
– Show Header: This is to show the ˜Find us on Facebook’ bar at top. It is only shown when either stream or faces are present.
10.15 More
This box is to display everything we may have missed in the boxes above.
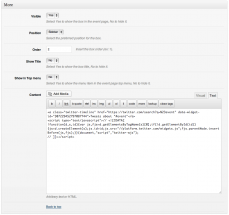
You have the following options:
– Visible: to display/hide the box on the page
– Order: to decide whether to display the box on the Main or Sidebar section.
– Show Title: to display/hide the title of the box More
– Show in Top Menu: to display/hide the quick link More on the Top Menu
– Content: You can add pictures (for more Sponsors), embed a presentation from Slideshare (as in the demo) or a Twitter Widget as in this example.
Tip: You can get a Twitter widget here. Remember to add your domain to make it work.
11. Sessions and Speakers
This is another fantastic introduction of Januas Theme. We have developed a custom system to manage sessions and speakers. Sessions can be assigned to Tracks, a visual way to group similar sessions according to topic.
Before we start take a moment to understand how the Session/Speaker/Event Page Display flow works:
1. Create a Schedule page (you need to do this only once)
2. Create an Event
3. Create a Session
4. Create a Speaker
We will take you through the different steps, but it is key you follow the above order to easily add a Schedule to your event.
11.1 Creating a Schedule Page
Creating a Schedule Page is something you need to do only once. Please follow these steps:
– Change the Permalink Structure to Post Name (Settings->Permalinks)
– Go to Pages-> Add New
– Title the page Schedule
– Select from the Page Attributes box on the right hand side select ˜Event Schedule’
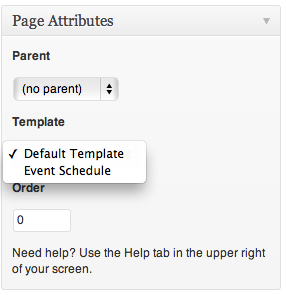
– Publish the page and you are done!
11.2 Creating an Event
Please refer to the section above Creating Your First Event
11.3 Creating a Session
Creating a Session is super easy. Just head to Sessions-> Add New “ These are the different sections:
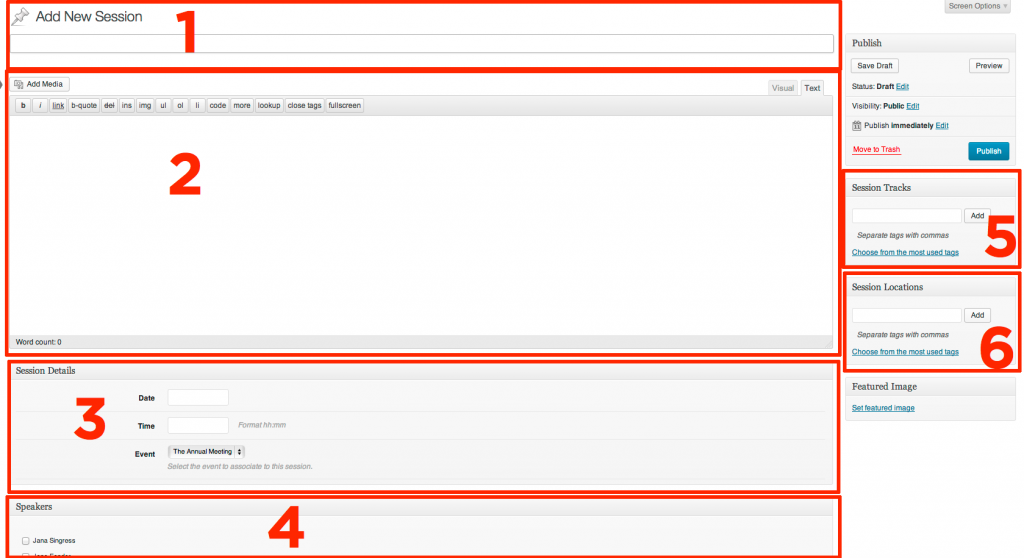
1. Session Title: Add the title of your Session
2. Session Description: Add here the description of your Session. If you want to add images or media, click on Add Media. You can see an example of a Session with a picture here. You can add a video or whatever pleases you.
Do consider the layout requirements and mobile version before adding large images. We discourage using the Featured Image function on Sessions.
3. Session Details: You can add Time and Date of your Session and most of all, link it to the Event of belonging. If you don’t see any event in the dropdown Event, this is because you have not created any Event yet, refer to the section above Creating Your First Event.
4. Speakers: If this is your fist Session, this box may be empty. Once you have created your first Speaker you will see a list of available Speakers here. Simply tick the box to associate one or more speakers to a specific session.
5. Session Tracks: Tracks identify a common topic area of different sessions. If you want to your attendees to quickly skim through the schedule tracks are very useful.
If for example you want to group all the Business sessions, just create a Business Track and Add it to the Session.
As for Event Categories we suggest to create Tracks for a specific Event in advance. In this way you will be able to quickly assign Tracks to Sessions.
To create Tracks in bulk, head to Sessions-> Tracks
Add the Name of the Track and its Slug.
Save and then click on Edit the newly created Track.
![]()
You will get this screen.
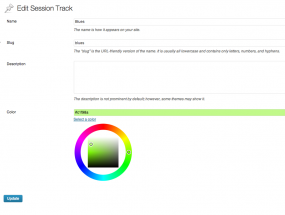
Pick a Color for the Track, this will show on the Event Schedule (Box and Extended Schedule) on the Event Page.
6. Locations: Here you can specify the room or venue of a specific session. You can follow the same procedure of Tracks to bulk create Locations, although there is no need to specify a color.
That’s it, you have created your first Session!
11.4 Creating a Speaker
Creating Speakers has never been easier. Just head to Speakers-> Add New:
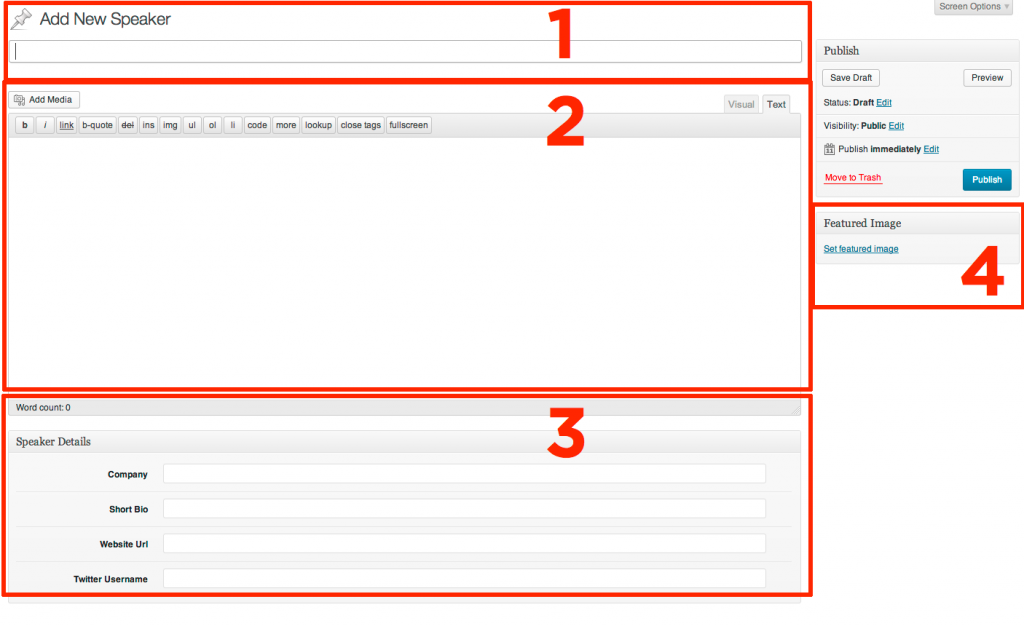
Here are the different options, explained:
1. Title: here gs the name of the Speaker
2. Description. Here you can add a catchy description about your speakers. You can also add media but bear in mind that the official Speaker picture is managed by the Featured Image dialogue (#4).
This is the picture that will be displayed on the Sessions and in the Speakers Box on the Event Page.
3. Speaker Details: You can add Company, Short Bio, Website Url and Twitter Profile. Leaving one of these inputs blank will not show the corresponding information.
4. Featured Image: This is where you set the Featured Image that will be displayed whenever a Speaker is showed on the website.
11.5 Assigning Speakers to Sessions and Sessions to Events
Once you have created Events, Sessions and Speakers, Open a Session and link it to the relevant event. Also pick the speaker(s) of the session. Read the steps above to create them.
12. Best Practices and Tips
– We suggest to follow our directions and use the sections as instructed. Using the sections in different ways may result in compromising the layout. We won’t be able to help in that case.
– Install as few Plugins as possible. Januas is a quite complex theme. We custom developed all the different functions.
There are no plugins requirements. The performance of your theme is strictly linked to installing as few plugins as possible and to respecting the section purposes.
– Do backup “ always. Before making any changes do run a backup. We have a long history of customers losing their work because they did not back up.
13. Language Integration
If you want to edit the language files we provided, we suggest to use a free software called Pdit. Here is a comprehensive tutorial on how to do it.
The language files are located in /lib/languages “ You will need to save the files here once edited.
14. Event Espresso integration
Januas works great with EventEspresso. EventEspresso is a WordPress plugin which allows you to handle event registration and ticketing on your own site. To use EventEspresso with Januas you will need to purchase it from EventEspresso.com.
Please note that Januas only supports version 4.0 Beta and above. Also note that the above integration will only include the display of the ticket selector shortcode. More advanced integration will require custom development.
Once you have purchased and downloaded EventEspresso, you will need to install and activate it. Here is quick guide on how to install and activate EventEspresso.
After installing Event Espresso, the first thing you need to do is to choose a payment method.
EventEspresso comes with Invoice, Authorize.net AIM, Bank Draft, Check, PayPal Pro, and PayPal Standard payment methods. To choose a payment method go to Dashboard and then click on Event Espresso > Settings > Payment Methods.
Activate the payment method you want to use, and then provide the details required to use that payment method.

Once you have configured a payment method, the next step is to create your event in the EventEspresso.
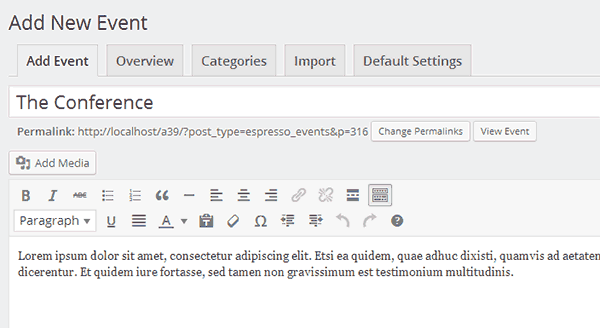
Go to the Dashboard and then click on EventEspresso > Events. Click on the Add New Event button to create your event.
Provide your event title, and add the description. Make sure that the event title and description and similar to your event details in Januas.
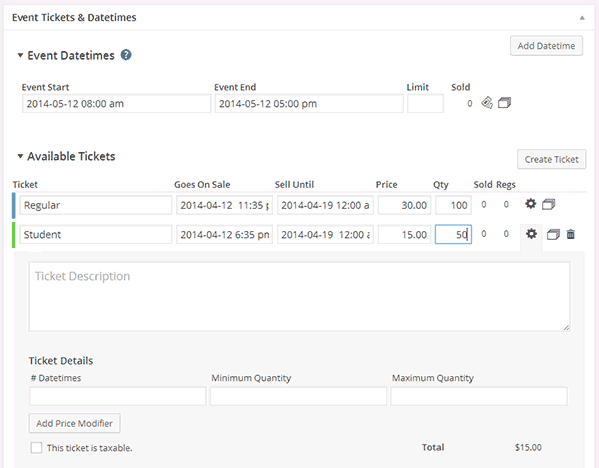
After that scroll down to Event Tickets & Datetime section. There you need to select your event date and time and then enter ticket information. You can create different types of tickets here by clicking on create ticket button.
Once you are satisfied with the event, you can hit the publish button to make it live. EventEspresso will publish your event. On the Event page you will now see shortcode button below the Event Title.
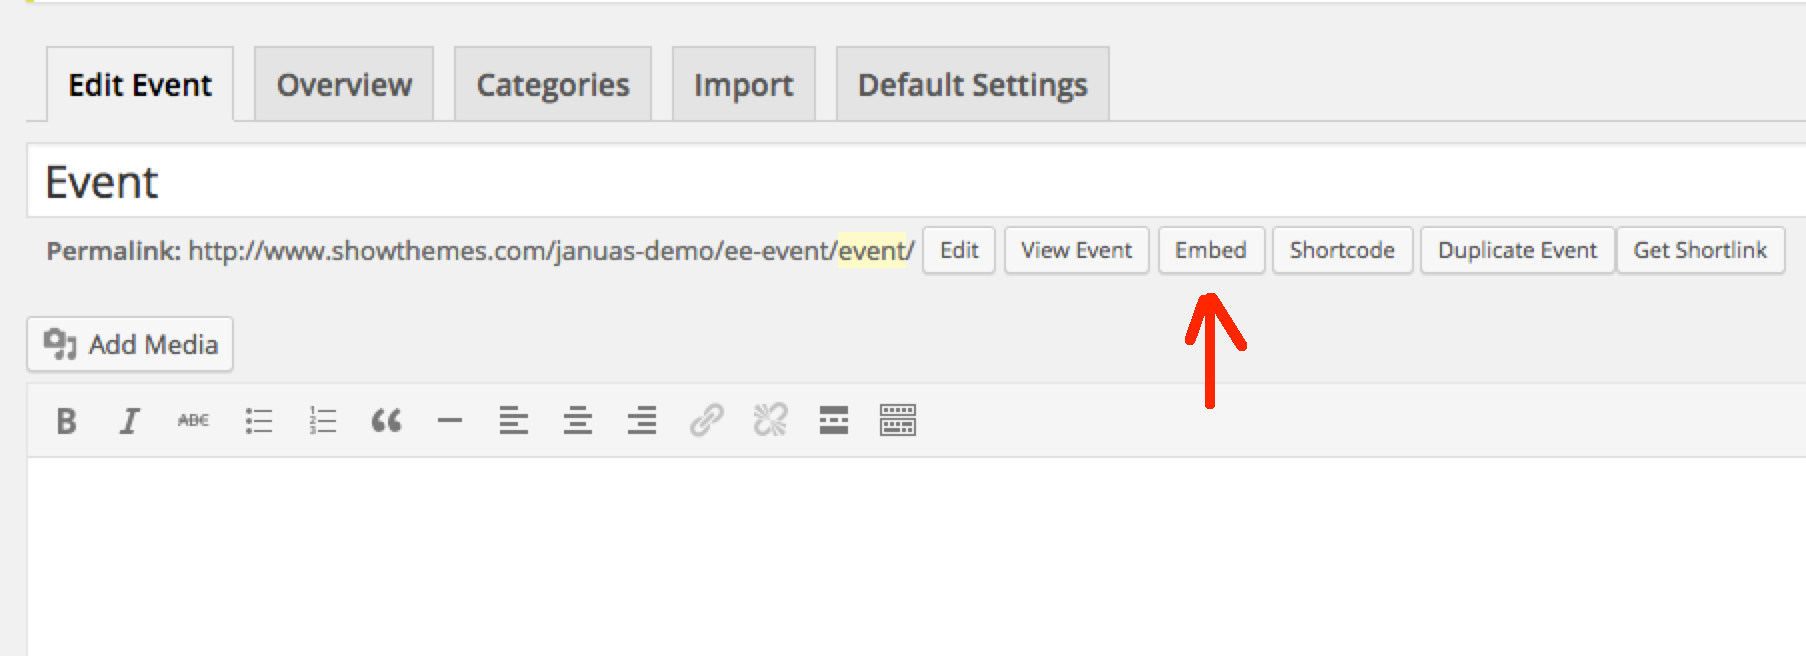
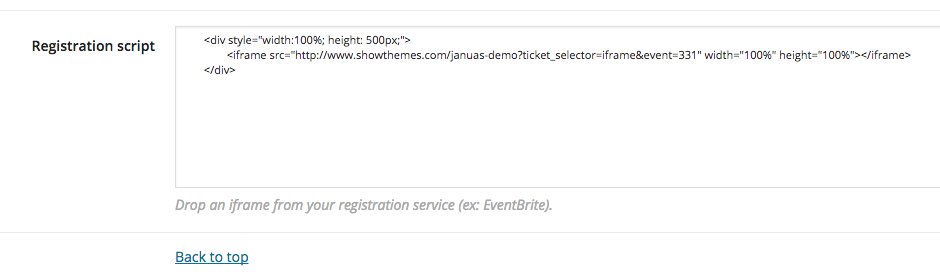
Click on the embed button, this will bring up a popup containing an embed code. Copy this code, as you will need it in the next step. To display the ticket registration on your event, Go to Events > Name of Your Event > Registration, and paste the code you copied earlier paste it in the Registration Script field. Don’t forget to click on the save button.
15. Woocommerce integration
This tutorial is to set up Woocommerce with Januas. Woocommerce is a powerful plugin to turn your site into an eCommerce platform. While Woocommerce is not a platform to sell event tickets, we have tweaked it to make its product selector a ticket selector. Bear in mind that if you use Woocommerce as your ticketing option in one of our themes, you won’t get specific event functionality. ‘Products’ will become ‘Tickets’, and everything will be geared towards selling tickets, not products. The add to basket functionality will be dedicated only to selling tickets and selling other products than tickets may be compromised.
- Search, install and activate Woocommerce
- Configure Woocommerce: add your account if you have one (company information).
- Set up your PayPal account (you can also set up other payment gateways supported by Woocommerce)
Configuring Woocommerce: https://docs.woocommerce.com/document/configuring-woocommerce-settings/
Woocommerce > Settings > Payments > Paypal

You can create both “Business” and “Regular” Paypal Sandbox accounts for testing.
- Once you set up Woocommerce, you can go ahead and create your ‘Products’. These will be effectively your tickets.
To create a new product (a ticket), click on Products > Add new>

- Include title, description, regular price, and a short description.

- Add an SKU code. Save, be sure that the status is “Published”.

Note: Please refer to Woocommerce documentation to learn more about products. - Once you’ve created your products you will need to place your ticket selector in the Registration Widget.
You need to add your product shortcode https://www.showthemes.com/docs/januas/documentation-and-theme-guide/#10.7
Go to your event page. Add the product shortcode [products skus="001"]
Replace the SKU code “001” for the code you are using on your product.
- Once you save, you should be able to see the ticket selector live on your page.
Note: External Products or Grouped products will display a ‘Read More’ Link.

16. Tickera integration
Tickera is a paid plugin available at https://tickera.com/
Follow these instructions to add Tickera into your site: Tickera Integration
Then, go to your event page, and add the Tickera “Ticket” shortcode on the “Registration Script” area.

17. Eventbrite integration
You can obtain the embed code from Eventbrite by creating an event and tickets at www.eventbrite.com.
1- Create an event.
2- Use the “Invite & Promote” option. Choose “Website Integrations”.

3- Click on “Show me”.

4- Click on “Embedded on the page with your content” > Embed Code. Copy the code inside.

5- Since Januas is a multi-event theme. You need to add the shortcode for each event.
Go to your event page, and add the Eventbrite code on the “Registration Script” area.

Do not forget to update your page.
Here is a screenshot of the register area inside your event

18. Gravity forms integration
Gravit Forms is a paid service, so you need to have that into consideration.
You are free to purchase that product from their website: https://www.gravityforms.com/
Here are some nice instructions about how to install the plugin and create your first form: https://docs.gravityforms.com/getting-started/
Once you have the shortcode from that form, go to your event page, and add the Gravity Forms shortcode on the “Registration Script” area
Here is a screenshot of how the Gravity Forms shortcode looks like
